# Guide
# Introduction
Klip is a web app and browser extension to make screen and camera recordings.
Videos are uploaded to outklip.com. You can view the video and edit in our cloud-based editor. To share the video with others, you can send the video link or upload to YouTube. You can also download the video file to your computer.
When signing up for Outklip, the Basic plan features are free. To take your videos to the next level, you can upgrade to the Subscription plan.
Watch the video below for a quick intro to Outklip.
# Getting Started
# Record a video
With the Outklip browser extension (opens new window) you can make three types of video.
# 1. Entire desktop
Record everything on your computer screen. You can also selectively record an application. Along with screen you can record voice and camera.
# 2. Browser tab
Record a browser tab with tab audio, voice and camera.

# 3. Camera only
Record camera and voice.

# Record desktop
Install the Outklip browser extension (opens new window) and log in (opens new window) to create a screen recording.
- Click the Outklip browser extension icon to open the Create a video dialog.
- On the dialog, click RECORD.
- On the Share your screen dialog, double click inside Your Entire Screen. After a countdown, recording will begin.
- To stop recording, click the Outklip browser extension icon on the top right. A new browser tab will open to a webpage where you can view the video.
- Edit title and description, copy video link and send the link to others. You can also upload to YouTube or download the video.
# Record an application
Install the Outklip browser extension (opens new window) and log in (opens new window) to create a screen recording.
- Click the Outklip browser extension icon to open the Create a video dialog.
- On the dialog, click RECORD.
- On the Share your screen dialog, select Application Window and click the application to record (see tip below). After a countdown, recording will begin.
- To stop recording, click the Outklip browser extension icon on the top right. A new browser tab will open to a webpage where you can view the video.
- Edit title and description, copy video link and send the link to others. You can also upload to YouTube or download the video.
TIP
For the application to appear under Application Window, the browser and the application should not be fullscreen.
# Record browser tab
Install the Outklip browser extension (opens new window) and log in (opens new window) to create a screen recording.
- Click the Outklip browser extension icon to open the Create a video dialog.
- On the dialog, select the Browser Tab option.
- Click RECORD.
- After a countdown, recording will begin.
- To stop recording, click the Outklip browser extension icon on the top right. A new browser tab will open to a webpage where you can view the video.
- Edit title and description, copy video link and send the link to others. You can also upload to YouTube or download the video.
# Record camera only
Install the Outklip browser extension (opens new window) and log in (opens new window) to create a screen recording.
- Click the Outklip browser extension icon to open the Create a video dialog.
- On the dialog, select the Camera only option.
- Click RECORD.
- A countdown appears and after it ends, recording will begin.
- To stop recording, click the Outklip browser extension icon on the top right. A new browser tab will open to a webpage where you can view the video.
- Edit title and description, copy video link and send the link to others. You can also upload to YouTube or download the video.
# Import a video
# Video Features
# View video
All your videos are listed on outklip.com/myvideos (opens new window). Click a video to open its link.
# Download
- All your videos are listed on outklip.com/myvideos (opens new window). Click a video to open its link.
- Click the ⬇️ Download button beneath the video. On the dropdown menu, click to download either the mp4 or webm video file.
# Share
Outklip creates a unique link for every video, which can be sent to others.
- All your videos are listed on outklip.com/myvideos (opens new window). Click a video to open its link.
- Copy the link beneath the video and send it to others.
# Viewer analytics
COMING SOON
# Embed
COMING SOON
# Upload to YouTube™
Outklip supports uploading videos to YouTube™.
- After recording a video, a browser tab will open and navigate to the video webpage.
- If Outklip doesn't have permission to manage your YouTube™ account:
- Click the YouTube button beneath the video. A modal dialog will pop up with this message "Next we'll navigate to a webpage to allow Outklip to access your YouTube™ Account. Ready?" Click Yes.
- On the next few screens, select the Google/YouTube™ Account and Allow Outklip permission to upload videos to YouTube™.
- Now Outklip is connected to your YouTube™ account.
- To upload the video to YouTube™, click the YouTube™ button beneath the video.
- A modal dialog will appear. Set YouTube™ visibility to either Public, Private or Unlisted, and whether the video is Made for Kids.
- Click the Upload button.
- After uploading to YouTube™, the modal will refresh to show the YouTube™ video link.
# Share to Twitter and Facebook
COMING SOON.
# Comment
You must be logged in (opens new window) to comment.
- Open the video link on a new tab.
- On the webpage that opens, type a comment beneath the video and click the Comment button to post.
# Delete
You can only delete videos you have created.
- All your videos are listed on outklip.com/myvideos (opens new window). Click a video to open its link.
- On the webpage that opens, click the 🗑️ Delete button beneath the video. This will open a modal: Click Yes on the modal to delete the video. The video is deleted permanently from Outklip.
# Camera
# Resize and move camera
COMING SOON.
# Apply camera filters
COMING SOON.
# Show profile picture instead of camera
COMING SOON.
# Video Editing
# Trim
The trim video feature can be used to reduce the length of the video by keeping only certain parts.
- All your videos are listed on outklip.com/myvideos (opens new window). Click a video to open its link.
- Click the ✂️ scissors button beneath the video. A new webpage will open for trimming the video.
- Drag the slider handles to select the part of the video to keep.
- To add more parts to the video, click Add part.
- After setting the start and stop times of the parts of the video to keep, click play on the video to view the trimmed video.
- Click the Finish button. A new video is created (while the original video is kept intact), based on the trim settings.
# Crop
The crop video feature can be used to keep only a smaller rectangular area of the video and remove the rest.
- All your videos are listed on outklip.com/myvideos (opens new window). Click a video to open its link.
- Click the crop button beneath the video. A new webpage will open for cropping the video.
- A dashed animated rectangle will appear on the video. Content inside this rectangle will be kept and everything outside the rectangle will be removed.
- Adjust the size of the rectangle by moving the mouse pointer to any corner of the rectangle, or the center of the edges of the rectangle. Click the mouse and drag to adjust the size of rectangle. View the video by clicking the play button.
- Click the Finish button. A new video is created (while the original video is kept intact), based on the crop settings.
# Add text annotations
The text annotation feature can be used to add text and position it anywhere on top of the video.
- All your videos are listed on outklip.com/myvideos (opens new window). Click a video to open its link.
- Click the add text button beneath the video. A new webpage will open for adding text annotations.
- To enter text, type in the text input box beneath the video. Adjust the font size, font color and background color of the text. Drag the slider handles to set the time range when the text should appear in the video.
- To change the position of text, click the text in the video and drag the mouse.
- To add more text boxes to the video, click Add text box. A new text box will be appear on the video, with corresponding settings for text, font size, font color, etc. View the video by clicking the play button.
- Click the Finish button to finish. A new video is created (while the original video is kept intact), based on the text annotation settings.
# Create GIF
Outklip lets you create GIFs from videos.
- All your videos are listed on outklip.com/myvideos (opens new window). Click a video to open its link.
- Click the GIF button beneath the video. A new webpage will open for creating a gif.
- Drag the slider handles to select the part of the video for the GIF. View the video by clicking the play button.
- Click the Finish button to finish. A GIF is created (while the original video is kept intact), based on the settings.
# Add music soundtrack
COMING SOON.
# Change video speed
COMING SOON.
# Add watermark
COMING SOON.
# Usage Plans
# Basic
With Outklip Basic you can do the following.
- Record 5-minute screen recordings in 720p resolution.
- The videos have an Outklip watermark.
- Each video is stored for up to one year. After a year the video is deleted.
- Video files can be downloaded in both .webm and .mp4 formats.
- Edit videos with features like trim, crop, annotate with text, add music soundtrack and convert to GIF.
# Paid
The Outklip paid tier let you do so much more.
- Record videos longer than 5 minutes
- Record videos in up to 4K resolution.
- No watermark on video.
- Indefinite video storage allows you to create video archives for training or record-keeping.
- Video files can be downloaded in both .webm and .mp4 formats.
- Edit videos with features like trim, crop, annotate with text, add music soundtrack and convert to GIF.
- Phone, chat and email support.
# Subscription
The ideal plan for prolific video creators. The Subscription plan provides 20 videos longer than 10 minutes, per month and no watermarks on all videos.
# System Requirements
# Browser requirements
Support on different browsers:
| Browser | Video playback | Screen recording |
|---|---|---|
| browser v49 and up (opens new window) | Yes | Yes, with the Outklip Chrome extension (opens new window) |
| Microsoft Edge v90 and up (opens new window) | Yes | Yes, with the Outklip Edge extension (opens new window) |
| Firefox v54 and up (opens new window) | Yes | No |
| Safari v11.0.1 and up (opens new window) | Yes | No |
# Internet requirements
Outklip needs a minimum internet upload speed of 4Mbps.
Videos are uploaded to outklip.com and since video files are large, this operation requires fast internet. To check internet upload speed, type 'internet speed test' in Google (opens new window) and run the test.
If the internet upload speed is below 4Mbps, video upload might fail. Even if upload fails, the video can be downloaded at the link below. Copy and paste link on a new tab to view the last recorded video:
chrome-extension://lbcabedlbpobhpongobnfkbfceedgdjk/lastvideo.html
# FAQ
# How to contact support?
We are a young company and work round the clock to provide good customer support. Feel free to contact us for support by either email or clicking the chat bubble at the bottom right of our homepage (opens new window).
We will reply within the hour M-F 9am-5pm US Central Timezone. On weekends too, we try to answer support requests as soon as possible.
# Why log in to use Outklip?
We ask users to log in for three reasons:
- Fast sharing: Videos are uploaded to the user account on outklip.com, to allow instant sharing. No file download and upload required, saving users time.
- Creator-only actions: Only the video creator is able to perform admin actions on the video, such as deletion, editing and viewing analytics.
- 3rd party app integrations: Direct upload to YouTube™ requires user authentication.
# How is Outklip better?
| Other products | How Outklip is better |
|---|---|
| OBS Studio, Camtasia, Quicktime, Dropbox/Box | Today you can record a screencast with OBS Studio/Camtasia/Quicktime, compress it with FFMPEG, upload it to YouTube™/Dropbox/Box and share the link with your team. This workflow involves three different apps and a lot of waiting, which is unnecessary overhead. Outklip lets you record and share in a single app, no need to download. It helps you go from start to shared screen recording in the least time possible. |
| Whatsapp and Instagram | While Whatsapp and Instagram allow users to record and share video clips, they do not support screen recording. |
| Slack | While Slack is used mainly for group text chat and voice/video calling, it does not support screen recording. |
| GoToMeeting, Bluejeans, Zoom, Skype and other screen recording tools | GoToMeeting and other screen recording tools allow screen recording but leave you with a video file that you need to upload somewhere and then share the link with someone. This is cumbersome. Outklip lets you record, edit and share in a single app, so what usually takes three tools can be done with three clicks. |
# How to update Chrome extension to the latest version?
- Open chrome://extensions in a new browser tab.
- Switch on Developer mode to enable.
- Click the Update button to update to the latest version.
# How to fix the 'Camera setup failed' error?
The 'Camera setup failed' error occurs when trying to enable camera on the Outklip browser extension dialog. The error is due to Outklip not getting permission to record camera.

To use the camera in a recording, allow Outklip permission to capture camera.
- Click the 🎥 video camera button on the browser address bar.
- A popup with 'Camera blocked' appears. On that popup, select Always allow... and click Done.
- Now enable Camera on the Outklip browser extension dialog. Outklip is now set up to record camera.
Note
If the camera still doesn't work, it is due to a bug in the Chrome browser: try enabling and disabling the Outklip Chrome extension on chrome://extensions and try the above steps again. It should work now.
# How to fix the 'Mic setup failed' error?
The 'Mic setup failed' error occurs when trying to enable mic on the Outklip browser extension dialog. The error is due to Outklip not getting permission to record microphone.
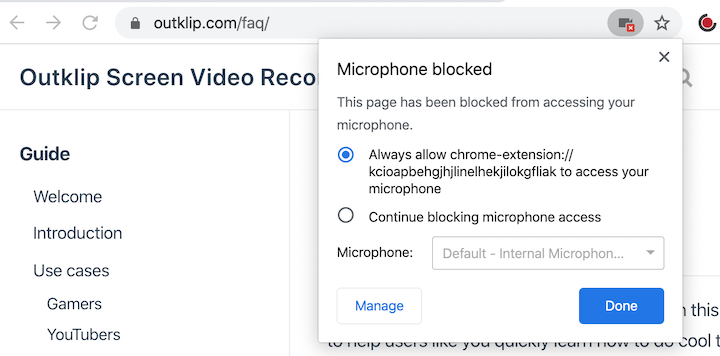
To use the microphone in a recording, allow Outklip permission to capture microphone.
- Click the 🎥 video camera icon on the browser address bar.
- A popup with 'Microphone blocked' appears. On that popup, select Always allow... and click Done.
- Enable Mic on the Outklip browser extension dialog. Outklip is now set up to record microphone audio.
Note
If the microphone still doesn't work, it is due to a bug in the Chrome browser: try enabling and disabling the Outklip Chrome extension on chrome://extensions and try the above steps again. It should work now.
# How to change browser extension settings?
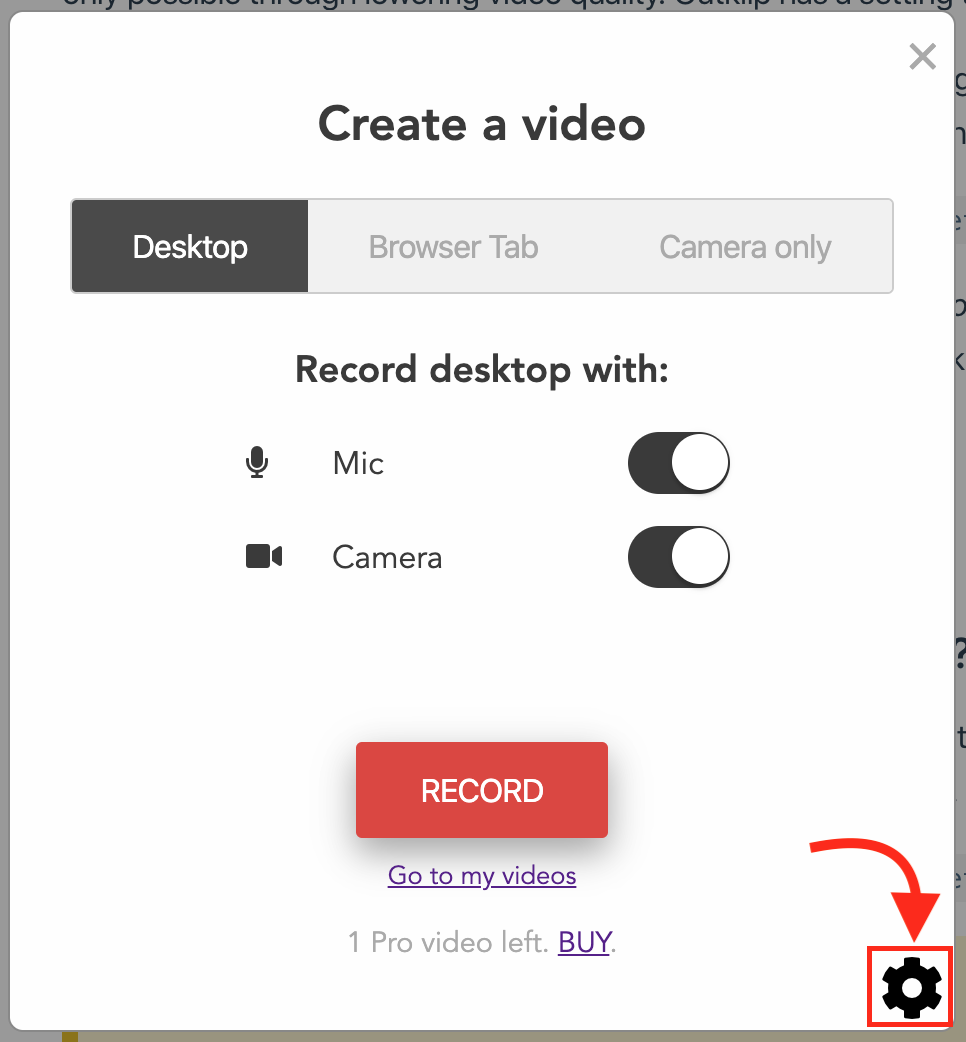
To open the Outklip settings page, click the Outklip browser extension icon to open the Create a video dialog. On the dialog, click the ⚙️ gear icon.
Alternatively, you can open a new tab and paste the following link:
chrome-extension://lbcabedlbpobhpongobnfkbfceedgdjk/settings.html
The following settings are displayed.
| Setting | What it does |
|---|---|
| Input devices | Select the audio and video input devices. |
| Video resolution | Sets the resolution of the recorded video. |
| Video frame rate | Sets the fps of the recorded video. |
| Profile photo in place of camera | Shows profile photo in place of camera, when camera is switched off. |
| Control panel | Shows control panel in the browser, with buttons to pause/resume and cancel recordings. |
| Recording countdown | Sets the value of the countdown timer (in seconds) before the start of recording. |
| Cloud video storage | Enables upload of videos to the cloud. If disabled, videos are stored in the browser. |
Note
The Outklip browser extension (opens new window) must be installed, to open links beginning with 'chrome-extension://'.
# How to store video recordings only in the browser?
By default, videos are stored on outklip.com. These videos can be accessed at https://outklip.com/myvideos (opens new window).
The most recent video is also saved in the browser and can be viewed at this link.
chrome-extension://lbcabedlbpobhpongobnfkbfceedgdjk/lastvideo.html
To store videos only in the browser and not in the cloud: open the browser extension settings webpage, click Disable next to the Cloud video storage setting and click Submit.
Note
The Outklip browser extension (opens new window) must be installed, to open links beginning with 'chrome-extension://'.
# How to fix audio/video sync issue?
COMING SOON.
# How to reduce video file size?
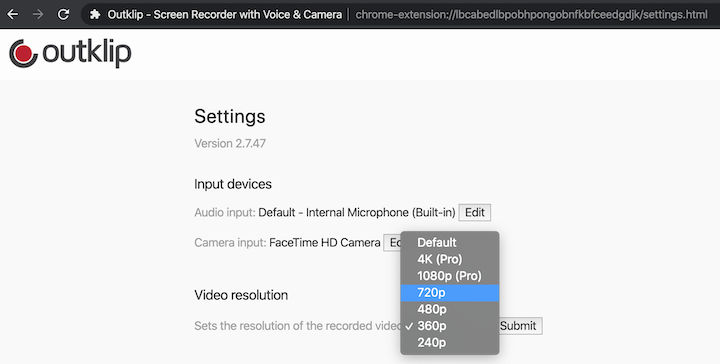
A smaller video file is faster to upload and takes up less internet bandwidth. But a smaller video file is only possible through lowering video quality. Outklip has a setting to change video quality.
To change video quality: Open the browser extension settings webpage and click the dropdown menu for Video resolution. The options are 4K and 1080p (for paid plan only), 720p, 480p, 360p and 240p. Select a lower resolution for a smaller file size and click Submit.
# How to change the recording countdown?
To change the countdown: Open the browser extension settings webpage, edit the Recording countdown value and click Submit.
# Why does the facecam not appear on every tab while recording?
In earlier versions of the Chrome browser, Outklip was able to show the facecam on every tab.
After a Chrome browser update in October 2019, Chrome extensions were stopped from doing tab operations, so Outklip can no longer automatically show the facecam on every tab.
Now, to make the facecam appear on every tab, follow these steps:
# BEFORE RECORDING
- Open all the tabs to record. Make sure the webpages to record are loaded in these tabs.
- Visit each tab and click the Outklip Chrome extension icon till the facecam appears on the webpage.
# DURING RECORDING
Now, when you switch tabs during recording, the facecam will appear on every tab.
# Why am I getting this error?
If any of the following errors appear while using the Outklip Chrome extension (opens new window), try the recommended fixes:
| Error | Cause | Recommended Fix |
|---|---|---|
| Timed out | Slow internet upload speed. Outklip needs a minimum internet upload speed of 4Mbps to use Outklip. | Check internet upload speed, by typing 'internet speed test' in Google (opens new window) and running the test. Switch to an internet connection with at least 4 Mbps upload speed |
| Logins don't match | When you have two or more Outklip accounts, and log out of one account and log into another. | Try recording a video again, the error won't occur a second time. |
For any other errors, send us an email or click the chat bubble found on the bottom right of the Outklip homepage (opens new window). We will reply within the hour M-F 9am-5pm US Central Timezone.